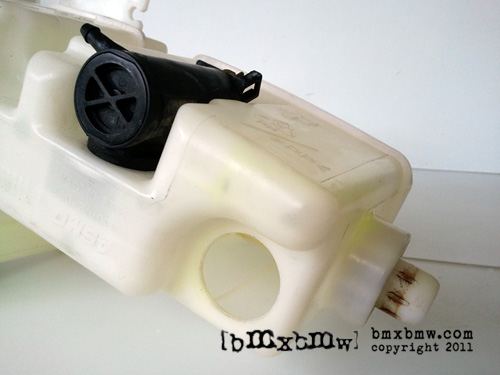
The USDM Mazda Protege never came with the windshield wiper fluid sensor. Since it's an option I didn't have, of course I wanted it. The wiring for the sensor is already there. You just have to run one wire, add a bulb, and install the sensor into the windshield washer fluid reservoir.
I had to remove the bumper to get to the reservoir. Then I removed the reservoir and drained it and cut a hole in it for the sensor. The hole I cut out looks good, but there's no way I can cut a hole to the tolerances that Mazda did. So I added a bit of silicone to where it is attached to the reservoir to make sure it wouldn't leak. Like I mentioned before, the wiring is already there. I plugged the sensor into the plug next to the reservoir.
Now the fun part.. wiring. I had to install a new wire. I plugged one end of the wire into the dash harness next to the fuse box. This is where the windshield washer fluid sensor wiring that is pre-installed ends, at least for the USDM cars. I ran the wire to the instrument cluster harness and added a bulb for the warning light.
I have wanted to make this thing for a long time. I chose to make the gauge pod for the passenger vent. Once again, the gauge pod is made from PVC pipe. Well, at least part of it is. I used a piece of interior plastic to fill the hole where the vent stuff used to be. Then I molded the PVC pipe into the plastic. It's hard to tell but the gauge pod is angled. This time it took seven days to make.
I got some stickers I designed back from the printer today. The hand drawn concept is on top. I like the letters I drew better. The others look too fonty. I think I'll scan the one I drew and have some more printed. ZM is the engine code and BJ is the chassis code for my car. Yeah, I designed it for my car. (surprise)
A-pillar gauge pods are so ten years ago. They are an easy way to add one, two, even three gauges to your car with little modification. But there are much better looking ways to mount gauges in your car. I made this instrument cluster dual gauge pod to hold two 52mm gauges. The concept of mounting two gauges in the instrument cluster surround is not new. Autometer has been selling these for years. However, they do not make them for very many cars. I used two pieces of PVC pipe and molded them into a stock instrument cluster surround. Of course there's a lot more to it than that. Measuring, fitment, symmetry, skill, and execution are all important and necessary to make one that looks nice. It took me ten days to make. When I make stuff like this, I think of it as a piece of Artwork, rather than just the part it was designed to be. The lines, the form, the shape, everything about it is Art to me.
Superflux LEDs come stock on high end cars such as BMW, Cadillac, and Mercedes. They are certainly not cheap. A single LED can cost as much as $1.00, which can add up fast. I used 24 LEDs (each side) for the taillights and 4 (each side) for the sidemarkers. I handmade the circuitboards for both. The ones for the sidemarkers are so tiny! The circuitboards are much bigger than the hole meant for the bulb to go through. So to get the new LED circuitboards in, I had to cut out the turn signal area from the back of the taillights and sidemarkers, then put them back together.
I'm making some domos out of car interior plastic. The plastic has a nice texture to it. I drew the domos onto the plastic with a marker, then I cut out the shapes with the dremel and sanded the edges smooth. I am carving out the mouths just like I would a piece of wood with wood carving tools. When I get all that done, I'm going to paint the mouths. The domo on the end is going to be 3-dimensional with an arm and a foot coming out of the plastic.
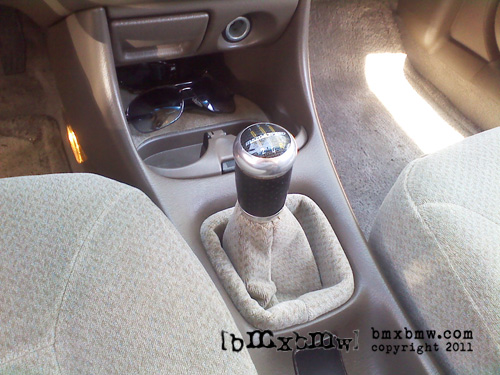
My car came with a brown vinyl shift boot and a brown plastic shift knob. Bleh. When I installed my Mazdaspeed Protege short shifter and shift knob, I also changed the shift boot to a black vinyl one. While this looked much better than the stock shifter, there was still room for improvement. I wanted to make a shift boot and I wanted it to match the rest of the interior. I got some seat fabric and I made patterns for the shift boot, center console lid cover, and handle. I sewed everything by hand. They turned out nice and are a perfect match for the rest of the interior. The cover looks like it is just a bunch of squares sewn together. It's not. They all have a different shape to allow for the curves.
The Mazdaspeed Protege short shifter makes shifting gears faster and it looks better than the stock shifter. The 2003 and 2003.5 came with different shift knobs. The 2003 shift knob was made by Sparco. The 2003.5 was made by Mazdaspeed. I've had both and the 2003.5 shift knob is way better. I also installed some Kartboy shifter bushings.
EDM stands for European Domestic Market. I'm really into EDM parts. Basically parts that we (United States) never got. We are USDM (United States Domestic Market). Ironically, people in other parts of the world want USDM parts. You always want what is hard to get. My car came with a radio pocket. It looks ok, but this is so much cooler. I had this shipped to me from England. It pops right in, but there is no wiring plug in the USDM cars for the clock. Good thing I am good at wiring. I made a plug for the clock from scratch and now it looks like my car originally came with it (even the wiring).
I installed a set of HID headlights to look like they came with my car. HID headlights are different than traditional halogen headlights. They produce light with an arc instead of a filament. Instead of just a bulb, HIDs have three parts. The bulb, the ballast, and the ignitor. Some HID kits, like mine, have the ignitor inside the ballast. This makes the ballast thicker, but it makes for a cleaner install. I hid the ballasts under the headlights. I had to arrange the wiring differently so I could get the moisture covers on the back of the headlights. It came out nice. You can't see the ballasts and there's just two wires that go to the back of the headlight.
The little triangle trim pieces behind your mirrors in your car are called sail panels. I wanted some sail panels with tweeters. Some cars come with them stock. Mine did not. Mazda did make some for my car, but they look kind of meh. This is the second set I've made. I'm going to cover the first set in carbon fiber. The shiny ones in the pics are the sail panels I made. Not only do they look better, they also hold bigger tweeters. The others are stock from the cars that did have tweeters.
Original installation First set February 2010 Second set July 2011
My name is Ryan. I love drawing, painting, graphic design, and photography. I also love cars. My blogs are mostly going to be about my car or a drawing, painting, or something I made. I am always making something. Most of the time it turns out pretty awesome. If it doesn't, I'll do it again. I am a perfectionist.